
3D Object Rendering

Platform:
PC
Engine:
Unity Engine
Duration:
1 month
Completion:
2020
Team Size:
1
Tools:
Visual Studio
Programming Languages:
C++, HLSL
My Roles:
Shader Developer
Overall Task
The task of this project was to develop a render pipeline for a 3D scene containing one to three different objects. Three different shaders were to be created to meet the specific visual requirements of the scene.
The implementation was carried out in the graphical framework developed during the module, which also needed to support an interactive lighting setup and texture integration.

My Tasks Included:
-
Developed a Rough Shader to simulate light diffusion on rough surfaces, enhancing realism.
-
Created a Matt Shader for non-reflective materials like fabric and stone.
-
Created a Glossy Shader for reflective surfaces, such as metal and glass.
-
Implemented texture mapping, allowing accurate application of textures to 3D objects.
-
Built a basic lighting system from scratch to control lighting and enable realistic illumination.
-
Configured a camera for proper scene viewing and optimal player perspective.
-
Tested shaders under different lighting conditions to ensure optimal performance.
-
Optimized the render pipeline for better performance and efficiency.
-
Debugged shader code to fix rendering issues and ensure smooth visual performance.
-
Documented shader code and pipeline setup for future reference and maintainability.

-

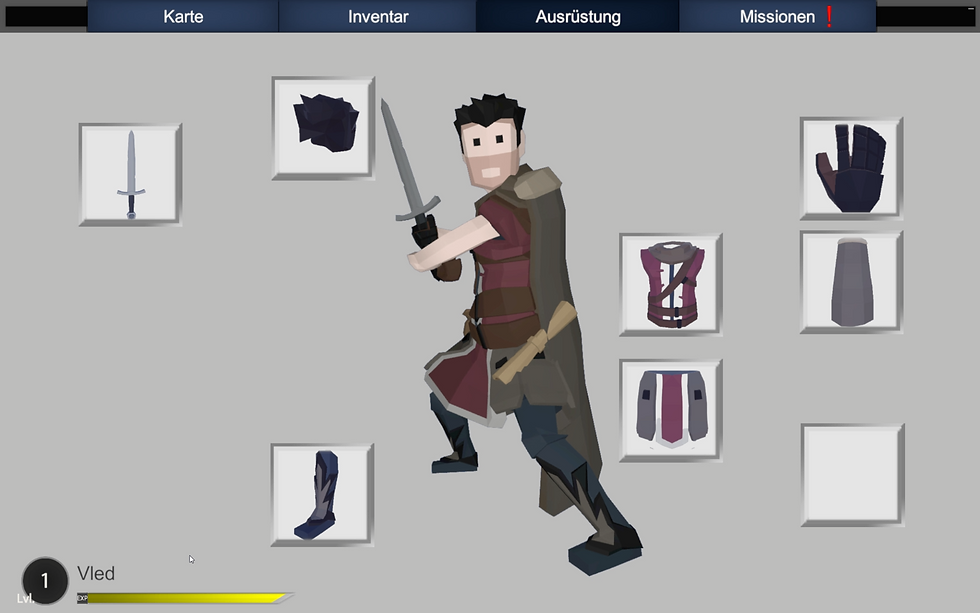
Character Customization
The character customization system of the game offers the player a flexible and personalized experience. At the start of the game, players choose whether they want to play as a male or female character.
The player's gender selection is saved and determines which clothing options are available in the game. There is a single merchant who sells clothing, and based on the player's choice, only items available for selected gender are displayed in the shop. From there, the customization extends further, allowing players to design their own outfit throughout the game. They can purchase individual clothing items such as gloves, shoes, back accessories like cloaks, headgear, tops, and pants, offering the freedom to mix and match various pieces rather than being limited to pre-defined outfits.
To make this system work, I utilized Scriptable Objects to define each clothing item and its corresponding properties. I also adapted the character’s mesh to accommodate all clothing items, ensuring that each piece is deactivated by default and positioned correctly on the character’s body. When the player selects a clothing item, a script identifies which specific object in the mesh corresponds to that item, activates it, and deactivates the previous piece of clothing. This seamless system allows for a dynamic and user-friendly character customization experience, where players can easily switch between various pieces of clothing, creating their desired look without any restrictions.

UI displaying the character's current equipment and options to equip or remove items.
Character Selection UI at the start of the game.

UI displaying the character's current equipment and options to equip or remove items.
Two characters encounter an injured raccoon, triggered by an earlier player decision.
Character Selection UI at the start of the game.
Map & Compass
The compass is a central element of the game's HUD, prominently displayed at the top-center of the screen. It provides directional feedback by showing the player the current camera orientation and highlighting the relative positions of important points of interest, such as merchants or NPCs with available missions. These points of interest are represented by icons that move dynamically along the compass based on their location relative to the player.
The map complements the compass by offering a detailed overview of the game's world. Players can interact with the map to mark locations, either by selecting existing points of interest or by placing a custom waypoint. Marking a location causes its icon on the compass to either glow yellow (if it already exists) or display a newly added icon specifically designed for waypoint navigation. Above the waypoint icon, the distance to the target is displayed in real time, providing players with an intuitive way to gauge how far they need to travel.
Icons for points of interest are displayed differently depending on their distance from the player. Objects farther away appear as small icons on the compass. As the player approaches, the icons gradually increase in size, creating a sense of proximity and focus. If the object is explicitly marked on the map, its icon remains at maximum size on the compass, regardless of distance. Once the marked object comes into view, it is further highlighted in the game world by a yellow particle effect, which follows the object wherever it moves, ensuring that players can easily identify it.
To enable the display of icons on both the map and the compass, each point of interest is equipped with a child object containing a sprite icon.
Map in a top-down view, where players can navigate using the mouse.
Enemies surrounded by a yellow circle, indicating a selected objective from the map, also marked on the compass.
Map in a top-down view, where players can navigate using the mouse.
Enemies surrounded by a yellow circle, indicating a selected objective from the map, also marked on the compass.
Compass UI with moving symbols.
The game employs a layering system to control visibility: the main game camera ignores this specific layer, while the map’s top-down camera is configured to render only this layer, making the icons visible on the map.
To optimize performance, the positions of map icons are updated only when the map is open. This selective updating reduces unnecessary calculations, which is particularly important for dynamic objects that move throughout the game world. On the other hand, the compass requires real-time updates to maintain accuracy. The compass continuously adjusts icon positions as the player moves and rotates the camera. This involves a calculation based on the player’s current position and forward direction, ensuring that icons are always correctly aligned with the object’s relative location in the world.
Compass UI with moving symbols.
Missions
In the game, missions are divided into main quests and side quests. The main quests drive the core narrative, while the side quests are optional tasks given by NPCs scattered throughout the village. These side missions offer players the chance to explore more of the game world and engage in additional activities that can provide rewards or unlock further story elements.
In the game, completing missions can have a direct impact on the world, making the player's actions feel meaningful and dynamic. For example, fulfilling a mission that involves collecting specific items for an NPC might lead to that NPC opening a stand at the marketplace. Initially, the stand appears empty, but once the mission is completed, the collected items are visually placed in the stand, providing a tangible reward for the player’s efforts.
The tasks required for each mission vary, and can include actions such as collecting specific items, defeating a certain number of monsters, or traveling to particular locations. These objectives are managed using Scriptable Objects, which store key mission data such as the number of items to be found or the type and number of monsters to be defeated.
For missions that require the player to visit a specific location, invisible objects are placed in the world.

UI displaying current main and side missions, including descriptions and rewards.

The player speaks with an NPC to accept a side mission.
UI displaying current main and side missions, including descriptions and rewards.
The player speaks with an NPC to accept a side mission.
As the player moves through one of them, the object checks if the mission related to that location is active in the player’s quest log. If the mission is active, the progress is updated accordingly, ensuring the player’s actions are tracked seamlessly within the game world. This system provides a modular and flexible way of managing missions, allowing for easy adjustments and additions to the game's objectives as needed.
Save System
The save system in AURA is designed to give players complete control over when and how they save their progress, with the only restriction being during cutscenes. The system allows for multiple save slots, letting players create and manage different save files. Each time a player saves, the game creates a text file containing all relevant information about the current game state.
This is achieved by organizing all the variables that need to be saved into a separate script dedicated solely to managing this data. These variables include player position, inventory, mission progress, and other essential game states. When the save process is initiated, this data is encapsulated into a structured object, serialized into a JSON string, and written to a text file within a specific directory. The use of Unity’s JsonUtility for serialization ensures the process is efficient and the saved data is human-readable for debugging purposes.
When a player chooses to load a specific save, the system retrieves the corresponding text file and reads its contents. Unity’s JsonUtility.ToJson() converts the object into a structured string format, which can later be read and applied back to the game.
As the data is being processed and applied to in-game objects, a loading screen conceals the process from the player, ensuring a smooth transition.
UI response when selecting a save slot to save the game.
Notification with a request to confirm the overwriting of existing save data.
This ensures that the player remains immersed and unaware of the technical processes occurring in the background. By combining modular scripting, efficient serialization, and a user-friendly interface, this save system provides both flexibility for developers and convenience for players.
Quick-Time-Event, where pressing the correct key at the right moment alters the outcome.
Quick-Time-Event, where the player must press a key multiple times quickly.
UI response when selecting a save slot to save the game.
Notification with a request to confirm the overwriting of existing save data.
Quick-Time-Event, where the player must press a key multiple times quickly.
Quick-Time-Event, where pressing the correct key at the right moment alters the outcome.
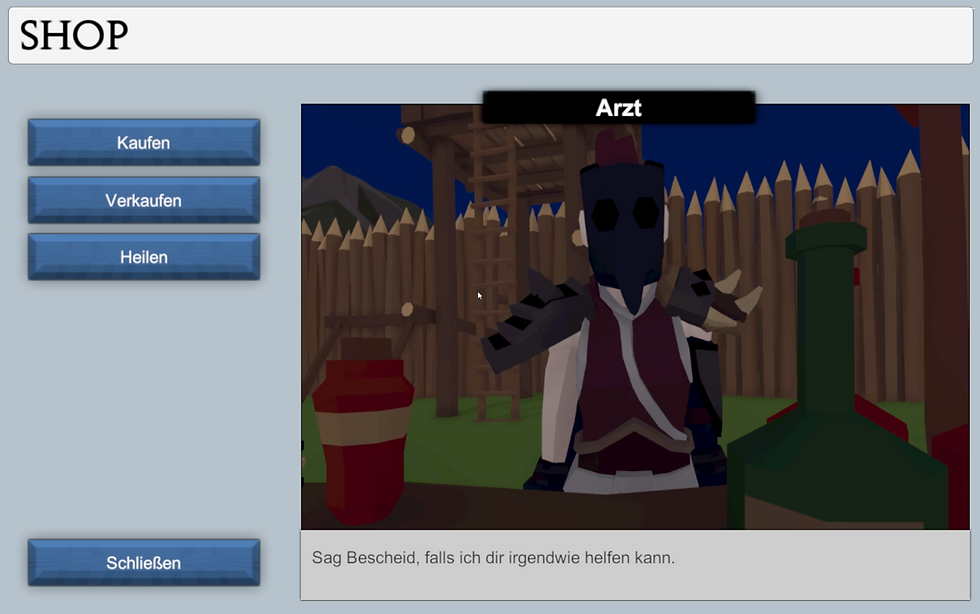
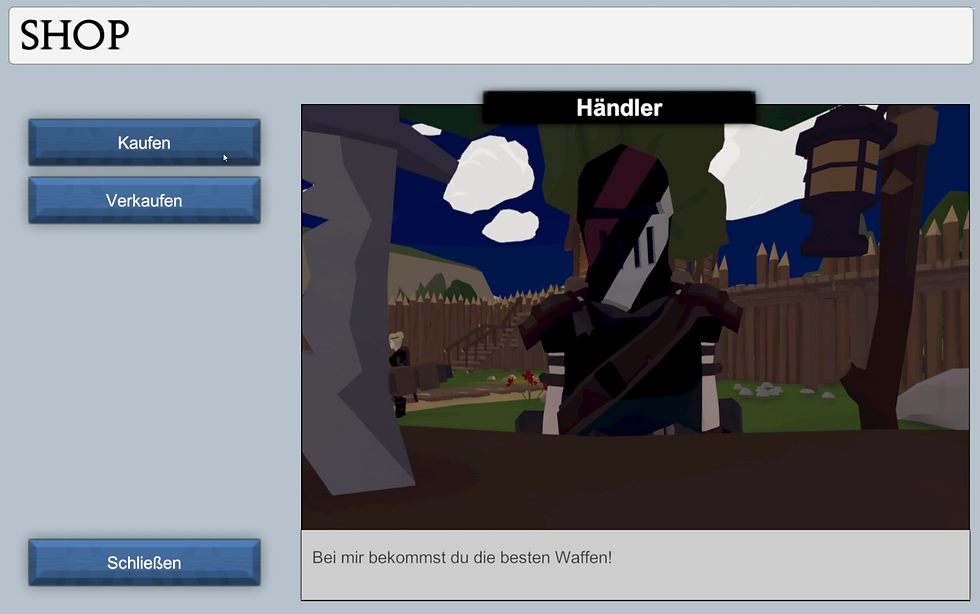
Shop & Merchants
The game features a variety of merchants, each specializing in different types of items such as weapons, food, and potions. The inventory of each merchant is predefined, reflecting their role through names like "Blacksmith" or "Doctor." To efficiently manage these inventories and maintain flexibility, Scriptable Objects were utilized. This approach allows for easy assignment of item lists, streamlined updates, and consistent management across all merchants.
Merchants offer more than just buying and selling items. Players can also complete quests that involve specific merchants or, in the case of doctors, pay a fee in gold to fully restore their health and mana bars. The shopping interface remains consistent for all merchants.
The interface itself is divided into key sections:
On the left side, it displays a list of available items, which varies based on whether the player is buying or selling. When buying, the list shows the merchant’s inventory, while selling displays the player’s inventory of sellable items. Quest items are never shown here, as they cannot be sold.
At the center of the screen, players can view a rotating 3D preview of the selected item, implemented using Unity’s Render Texture system. This system works by rendering a specific camera's view directly onto a texture. A dedicated camera focuses on the item, which is assigned a unique layer and continuously rotated via a script.
Shop UI with options to buy, sell, or end the conversation.
Shop UI displaying all items available for purchase, with a 3D view of the item and detailed information.
The camera renders only objects with this layer, creating a clean, immersive item preview displayed in the UI.
To the right, detailed information about the selected item is presented. This includes the item's price (either its cost when buying or its value when selling), a description providing background information or functional details, and its specific attributes. For instance, healing items show the amount of health restored, while weapons display how equipping them would affect the player’s attack power. These features combine to create a user-friendly, immersive shopping experience that complements the game’s overall design.
Shop UI with options to buy, sell, or end the conversation.
Shop UI displaying all items available for purchase, with a 3D view of the item and detailed information.

Two characters encounter an injured raccoon, triggered by an earlier player decision.
Two characters encounter an injured raccoon, triggered by an earlier player decision.
The player makes a choice, leading to a cutscene where they decide to pretend nothing happened instead of telling the truth.
Start Timer
void Time::StartTimer()
{
LARGE_INTEGER frequencyCount; // Frequency count
QueryPerformanceFrequency(&frequencyCount); // Reads out the CPU time
countsPerSecond = double(frequencyCount.QuadPart); // countsPerSeconds gets casted in a double
QueryPerformanceCounter(&frequencyCount); // Retrieves the current value of the performance counter
CounterStart = frequencyCount.QuadPart;
}The StartTimer method is used to begin tracking time with high precision, which is especially important for tasks like measuring how long something takes or tracking performance.
When this method is called, it first queries the frequency of the performance counter, which is a tool that allows us to measure time in a very fine-grained way. The frequency tells us how many ticks (or counts) happen per second, and this is stored in countsPerSecond.
Then, it retrieves the current value of the performance counter, which represents the exact time at that moment, and stores it in CounterStart. This will be the reference point from which we measure any elapsed time. The counter is based on the system’s hardware, making it very accurate for measuring time.
Two characters encounter an injured raccoon, triggered by an earlier player decision.
The player makes a choice, leading to a cutscene where they decide to pretend nothing happened instead of telling the truth.
Load Texture
void Texture::LoadTexture(D3D* d3d, ID3D10Blob* VS_Buffer)
{
D3DX11CreateShaderResourceViewFromFile(d3d->d3dev, L"texture.png", NULL, NULL, &CubeTexture, NULL); // Creates a shader-resource view from a file
D3DX11CreateShaderResourceViewFromFile(d3d->d3dev, L"texture2.png", NULL, NULL, &CubeTexture2, NULL); // Creates a shader-resource view from a file
D3DX11CreateShaderResourceViewFromFile(d3d->d3dev, L"texture3.png", NULL, NULL, &CubeTexture3, NULL); // Creates a shader-resource view from a file
D3D11_SAMPLER_DESC samplerDESC; // Describes a sampler state
ZeroMemory(&samplerDESC, sizeof(samplerDESC));
samplerDESC.Filter = D3D11_FILTER_MIN_MAG_MIP_LINEAR; // Filtering method to use when sampling a texture
samplerDESC.AddressU = D3D11_TEXTURE_ADDRESS_WRAP; // Method to use for resolving a u texture coordinate that is outside the 0 to 1 range
samplerDESC.AddressV = D3D11_TEXTURE_ADDRESS_WRAP; // Method to use for resolving a v texture coordinate that is outside the 0 to 1 range
samplerDESC.AddressW = D3D11_TEXTURE_ADDRESS_WRAP; // Method to use for resolving a w texture coordinate that is outside the 0 to 1 range
samplerDESC.ComparisonFunc = D3D11_COMPARISON_NEVER; // Clamping value used if D3D11_FILTER_ANISOTROPIC or D3D11_FILTER_COMPARISON_ANISOTROPIC is specified in Filter
samplerDESC.MinLOD = 0; // Lower end of the mipmap range to clamp access to
samplerDESC.MaxLOD = D3D11_FLOAT32_MAX; // Upper end of the mipmap range to clamp access to
d3d->d3dev->CreateSamplerState(&samplerDESC, &CubeTextureSamplerState); // Creates a sampler-state object that encapsulates sampling information for the mesh texture
}The LoadTexture method is responsible for loading textures and setting up their sampling properties for rendering.
It first loads the textures using D3DX11CreateShaderResourceViewFromFile, which makes the textures available to the GPU.
Then, the method configures a D3D11_SAMPLER_DESC to define how the textures should be sampled. It sets up linear filtering for smooth transitions between different texture levels and specifies that the texture should repeat when coordinates are outside the normal range.
Finally, the method creates a sampler state (CubeTextureSamplerState) based on the configuration and makes it ready for use during rendering. This ensures the textures are applied correctly with the desired properties.
Two characters encounter an injured raccoon, triggered by an earlier player decision.
The player makes a choice, leading to a cutscene where they decide to pretend nothing happened instead of telling the truth.
Camera Viewport
void Camera::SetViewport(D3D* d3d, float width, float height)
{
D3D11_VIEWPORT viewport; // Defines the dimensions of the viewport
ZeroMemory(&viewport, sizeof(viewport));
viewport.Height = height; // Height of the viewport
viewport.Width = width; // Width of the viewport
viewport.TopLeftX = 0; // X position of the left hand side of the viewport
viewport.TopLeftY = 0; // Y position of the top of the viewport
viewport.MinDepth = 0; // Minimum depth of the viewport
viewport.MaxDepth = 1; // Maximum depth of the viewport
d3d->d3devcon->RSSetViewports(1, &viewport);
}The SetViewport method is used to define the area in which the scene will be rendered on the screen. It begins by setting up a D3D11_VIEWPORT structure that holds information about the viewport's size and position. Specifically, it defines the width and height, which determine how large the visible area will be. The top-left corner of the viewport is set to (0, 0), meaning the rendering starts at the top-left of the window. Additionally, it sets the depth range, with the minimum depth at 0 and the maximum at 1, ensuring that all rendered objects fall within the visible depth range. Once the settings are applied, the method tells Direct3D to use this configuration by calling RSSetViewports. This allows the scene to be rendered within the defined viewport, ensuring proper display on the screen.
Two characters encounter an injured raccoon, triggered by an earlier player decision.